In cinema, rendering algorithms are so advanced, that everything can look 100% real. Advanced shaders, hi poly models and accurate lighting models all look perfect. In a game engine, you lack all three. Shaders are getting better, and poly counts are getting higher, and the lighting is getting better, but it is still a long way off of our pre rendered counterparts. This paper will discuss the theory involved in painting a color map for a real time model. I will cover engines that have no lighting, vertex based, and per pixel shading.

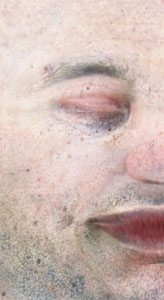
To the right: Color map for cinema Dr. Sid from Final Fantasy:The Spirits Within. Notice that it is color only. The value is all extremely similar, and it looks like a flattened face.
To the left: Color map for video game. lighting information is painted in. Appears to have volume.
What is the purpose of a color map? In cinema, it provides only the color of the object. All lighting information is calculated at render time, using various other maps to influence the lighting, and an advanced lighting algorithm. In a video game, we use the color map to describe the surface of the model. Some engines have normal maps, specular maps, and bump maps to affect the lighting of the color map, but they only work when the camera and light are at different angles. There will still be many times in game, when the model is viewed at almost full 100% brightness. Without a properly painted color map, the model will look flat and unappealing. So while specular maps and normal maps can be used to augment the color map, they should not be relied on fully. Until game engines have accurate radiosity, occlusion, and sub surface scattering at a pixel level, we will continue to need well painted color maps.
The only time in a game that your objects will look like the far left version is if there is only one light, with no ambient. Which is never, if at all. The middle version is how your model will be viewed 40-70% of the time. The far right is how your model will look about 10-30% of the time. The far right shows how flat your model will look without any lighting information in it. it doesnt even look like it is a sphere, it just looks like a circle!
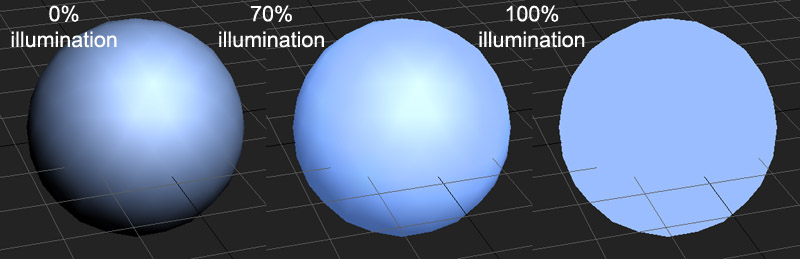
Because of the fact that, despite the engines capabilities, there will be times when the model will be lit at almost a 100% brightness. This makes it a good practice that when painting to keep your model at 70-100% fully lit. I have never seen a model that looked amazing at full bright (100% illumination) that then looked poor in a real time engine, despite any passes added (spec, normal, bump, environment map, etc) I have however seen models that look fairly good when lit with one light in a multi pass engine, that look like camel butt when in a better lit room. (Because of this, many per pixel games use only one or two lights per room, but as time goes on, the environments will be lit more like a real space, and you will see only the color map the majority of the time) So the idea should be to have a well painted color map. This will result in a good looking model 100% of the time.
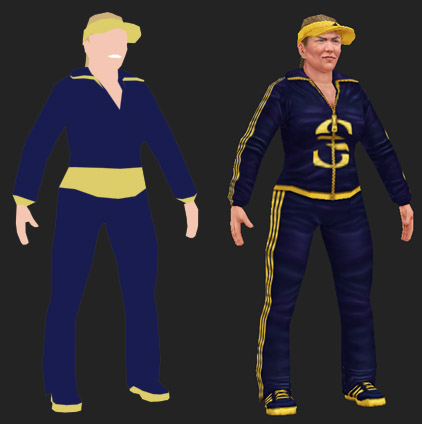
If this model was flood filled, it would show how low poly it is. 1500 triangles. It would not be a very interesting game model to watch in a game. The model to the right shows a texture that has lighting information baked in. It appears much more detailed than it really is.
Right now polycounts are still relatively low. Even if we were given the polycounts of Final Fantasy: the spirits within, with the current lighting models, they would not look all that great. So we must “fake” the lighting, even when the polygons are there to light it correctly. More often than not, we will not have enough polygons for ever bit of definition. The goal now is to have a good, rounded silhouette that deforms well, and most major bits of definition are modeled out. However many bits of detail must still be faked.
What do I mean by faked? Why do high poly models look so real in pre-rendered cinema situations? It is because of the lighting. Light reveals to us, the surfaces and their changes of an object. So if we must fake something that is not there, we do it by faking a lighting source revealing non existent geometry. It is not enough to color the geometry, unless it is a cell shaded game. We must make it look as if there was interplay of light between the different objects. This will fool the viewer into believing that it is really more complex and detailed than it really is.
Global Illumination, also called Occlusion, is the phenomena of light degrading the more it bounces. the closer to corners and intersections it gets, the weaker it gets. Spotlights behave like you would expect.
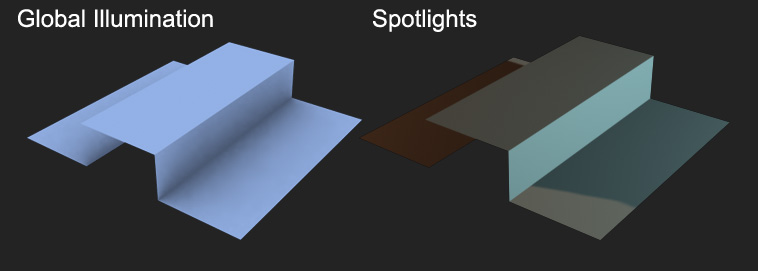
Final Fantasy uses a globally illuminated style of lighting, shown on the left. BloodRayne2 uses a spotlight style of lighting.

In order to do this, the artist must picture an imaginary lighting algorithm in their head. Picture the imagined detail, and then choose a lighting model, then you would paint the surface as if it was being lit by that imaginary model. There are two primary lighting models used in painting color maps. The first is the GI (global illumination) also called occlusion lighting. It simulates lighting coming from all directions, and surfaces only shadowing when they come into close proximity of another object. Good examples of games that use this lighting model are the final fantasy games and lineage. The other lighting model is to imagine specific light sources, one point, two point, or more. The artist paints the planes of imagined geometry that face these imaginary lights lighter, and the edges that face away darker. Using colored imaginary lights can further help the illusion, as all faces that face imaginary light one are white, and those that face imaginary light two are red, etc. Games that use this model are Blood Rayne 2, and Dark Age of Camelot. Most games fall somewhere in between these two models.
If you are consistent with this fake lighting, the viewer will be fooled into believing that these pieces really exist. The downfall is that this lighting info will not change in real time, like the real modeled geometry will. It is a trade off however, as we do not have the poly counts to model everything, and even when we do (or have the normal maps to imply it) the lighting engines fail us in certain circumstances (those circumstances being any well lit area). So while this lighting will not change as the light and model move, it is better to have the implied detail, than to have a barren model that lights accurately.
One mistake that is commonly made is to paint color maps as if it was an elevation map. Any imagined geometry gets brighter as it gets further off the surface of the real model. This would be how you would paint a bump map or an elevation/topology map. What it results in is a model that looks “worn away” like anything sticking out has had its color rubbed off. The reason is that this is not how real object light. They receive light based on their facing ratio to the light source. When the face is perpendicular to the light source, it will be brightest, and as it angles away, it gets darker. In the occlusion model, the flatter the surface the brighter it is lit, and the closer the plane of the surface lays to another plane of the surface, the darker it gets. The more consistent the lighting model is, the more believable it will be. The ultimate way to do this, would be to actually model all of the geometry out, create all the advanced shaders to make each object look exactly like the material they are made out of, and then set up either a series of spot lights, or a global illumination scene, and render the high poly model to the color map of the low poly model. This is how normal mapping is done, however it only renders the difference information of the surface distance. Kaldera and 3ds max have built in abilities to render to the color channel.
This very process is what we as artists are trying to do in our heads. Because of the map size, many times it is more efficient (and rewarding) time wise, to do all of this in our heads, rather than model it all out, and figure out how to write these advance shader networks, to then render it to a lower poly model.
In addition to picturing how the light would fall, one must keep in mind how different surfaces react to being lit. Metal behaves completely differently that skin, even when lit in the exact same environment. Using photographs, or observing the real material, is the best way to learn how these materials behave. How much of the light do they reflect and how strong are the highlights? How fast do the highlights fall off? Do the objects reflect onto other objects around them? Do they change the color of the light? Does the object light differently depending on the amount of light they receive? (An example is skin, because of its translucency; it is a different color in the shadows than it is when well lit) If you use the same lighting treatment on all surfaces, it will make your models look as if they were made out of that single material as a maquette, and then painted with acrylics to appear like there are different materials. However it will not look as convincing as it would if you change the behavior per material.
A good process to use, that helps me, is that whenever I am painting a material, I try to find as many good images of that exact material as I can, and then I try to find an actual texture painted by an artist who did it well. I will look at the photos to learn the “rules” of the material, and I will look at the artist’s texture to see how they broke it down to work in a pixel environment. Sometimes I will follow their lead, sometimes I will elaborate, and sometimes I will go in a completely different direction.
All of these theories are well grounded in the traditional arts. Painting books, classes and techniques will aid you greatly. Knowledge of anatomy, product design, and composition all come into play. You have to know how this imaginary geometry works before you can imagine how it would be lit. If you do not know the structure of the human face, you will not be able to imagine it in your head.
The last bit of texturing theory I have to impart. Always remember the target platform. Is it going to be viewed on a monitor or a TV? What size will it be on screen? How will the player see it? When you are painting, constantly zoom out to the typical viewing distance and see how it works on that level. It might look awesome full screen zoomed in on a couple areas, but when viewed at 50 feet, it might all blur together into an unreadable mass. This will help you keep your mind focused on all three levels of detail, large, medium, and small. A great game model will have all three, and will look amazing at any viewing distance.
Continue to part 2