I want to go even further in depth into my modeling process. I am doing this for two reasons. First and foremost is so that any potential employers looking through my work can get an idea behind my workflow. The second reason, is because so many people model incorrectly. Not that my way is the only right way (but it is a right way), but that I found it to yield superior results to the process I have seen other people use. So to begin, I want to show how most people model.
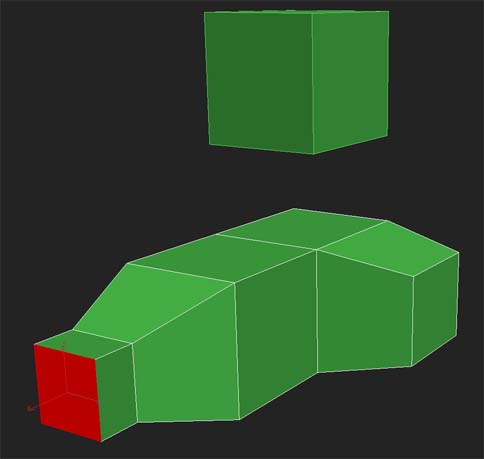
Most people start with a box, and then start extruding like this.
The reasoning behind this seems sound at first-to keep everything in quads of course! That seems to be the mantra today quads quads QUADS! While quadrilaterals are indeed good, they are not the most important part of the model, because whether its an 80 poly game model, or a 80 million micropoly displaced Lord of the Rings cave troll, no one will see your wireframe. What they will see, is the topology of the shape. So people need to start emphasizing shape first, THEN get to making their faces all 4 sided. If you get too caught up in keeping quads you will lose the artistic flow of the model.
Now you ask, "How then shall I model?"
Good question. Here is A way that I found that works for me. It is not the end all, but it hasn't failed me yet. I don't believe I am the first to use this, but I did not directly copy anyone's process when I thought it up.
Start with a cylinder.
That's right, I said a cylinder. Why a cylinder? Well because the human or horse or dragon or alien or insect or (insert anything organic here) form is cylindrical. Why in the world would you create extra work for yourself by having to tweak every face that you extrude from a model into a round shape, when you could have started with a round shape in the first place. There are two cylinders you can use, the 6 sided and the 8 sided. 8 works best, but if you are going for really low poly, 6 will work. The reason 8 works so well is that the human body is divided into regions, much like the earth. There is a left and right side, and a front and back. the 8 sided cylinder will give you a line dividing the character down the center (useful for mirroring over) and a line down either side. The remaining 4 lines give you the 3/4 lines that define the roundness of the shape.
Ok, now on to a real world example. In true cooking channel fashion, I have a model already completed to the exact point I want to illustrate. How convenient!
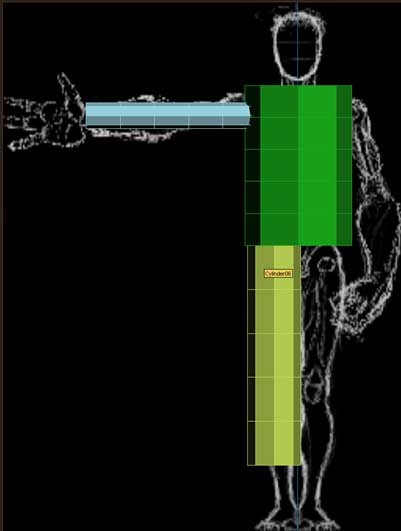
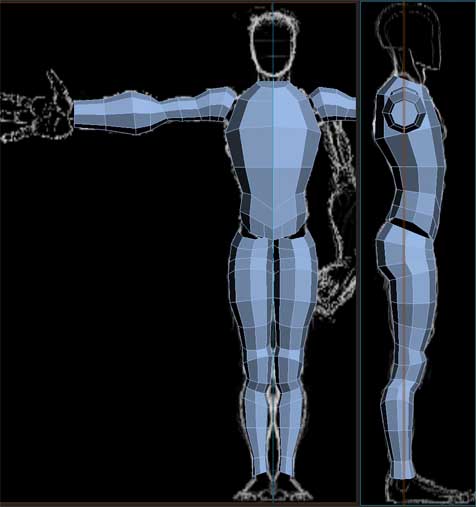
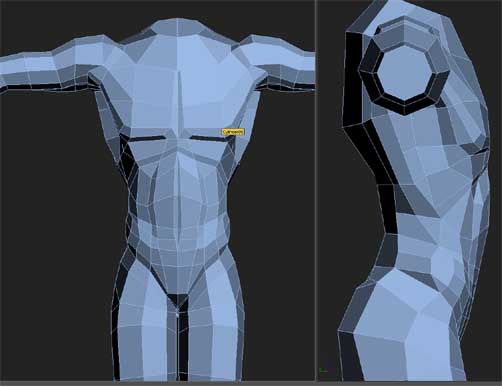
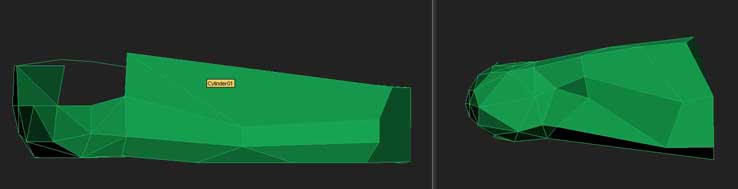
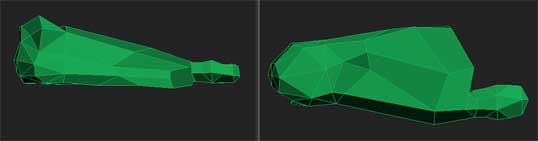
Place your cylinders in front of your reference images (always use reference images). Scale them to the basic length and size of what they are going to end up being. In this instance, the light blue is an arm, the green the torso, and the yellow is the leg. for now, don't mirror the torso yet.
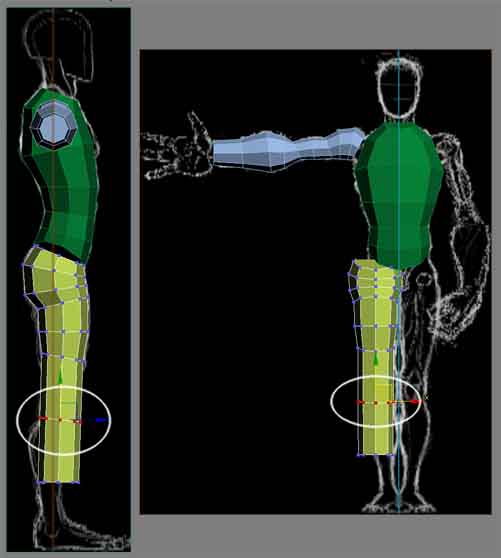
In this step I grab each cross section (a cross section is the ring of vertices or edges traveling perpendicular to the tube, and fibers are the lines and vertices traveling parallel to the tube) and scale them to fit that part of the reference image. Do this in both the side and front orthographic viewports. the arm and torso are finished, but the leg is still only halfway done. Not only does it need more definition, but it also has a case of "tube syndrome". (tube syndrome is when the cross sections remain perpendicular and the fibers remain parallel to the original cylinder. If you notice in the arms and the torso, the cross sections have been rotated to better fit the item they are defining. In the shoulder they rotate to define the deltoid. In the torso they rotate to define the chest. Doing this can add loads of definition to your model, without having to add more polys. On the leg, the cross sections have been rotated to define the buttox from the side, but from the front, they are still very much flat. they still need to be rotated to help define the leg.
This applies to high poly modeling as well. I cannot count the number of crappy made models I have seen around on the internet, where the wire frame looks just like a checker board. The lines do not follow the contour of the muscles and body at all. This results in poor deformations, as well as slower rendering times, because you have to add more and more cross sections to get the desired shape. This way will take longer, but it will yield superior results to an object with "tube syndrome". You will have to massage and caress your model into having proper topology in it's surface, as well as its wire frame. But people who take this extra time, are the ones who have great models, instead of mediocre models.
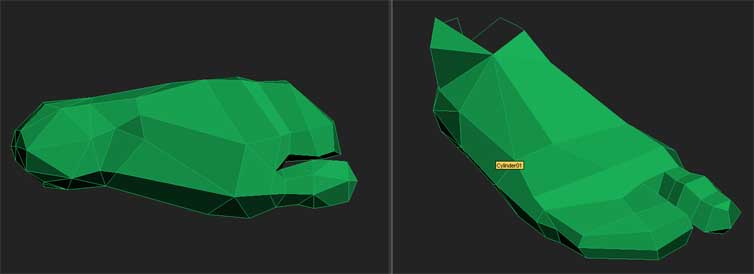
Notice how much better the leg looks, now that the cross sections are rotated to help define the leg. It is subtle, but it makes a big difference. Once your cylinders are in their rough proportions, and you are happy with them, Split the torso down the middle and mirror it over, so that you only have to do everything once. I combined the three cylinders so that I could join them.
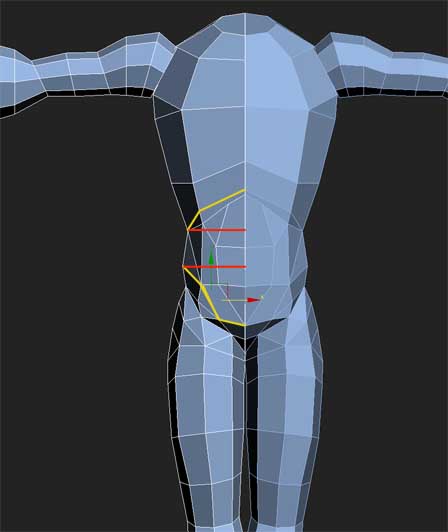
In this picture, I am showing how I define the stomachs on all my characters. The cross section originally traveled where the red line lies. The yellow line shows where it has been pulled to. This allows you to define the lower edge of the rib cage, and the obliques (V shaped muscles traveling towards the groin).
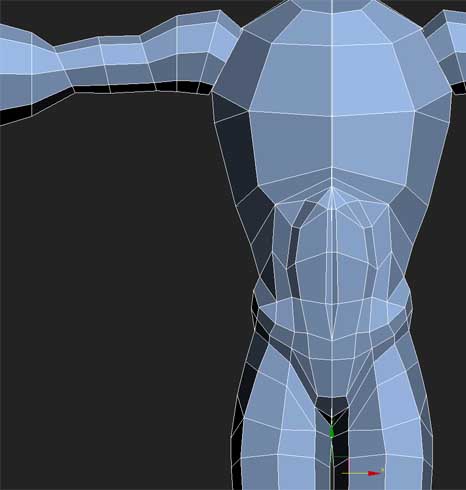
Here I have further defined the abs and the obliques, as well as the lower edge of the ribcage.
Sometimes in order to make a model flow correctly, you have to totally ignore the current flow of fibers and cross sections, and redirect them. I had to do this for the pectoral muscles. The yellow line shows where I made cuts, and then welded vertices, and drew new lines in order to accommodate this new definition.
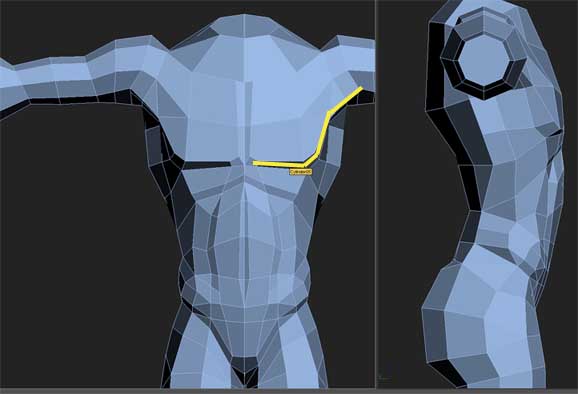
Here I added even more lines, and really made the chest read as a chest instead of a rough shape extruded out, which is what many people try to do with their muscles. If you don't know what it looks like under the skin, if you don't know how it inserts, and where, then do not try to do a model that has defined muscles. Period. Do not attempt to make up muscles either, and claim that it is an Alien or a Monster, and it doesn't matter because the muscles are made up. You have to know correct anatomy before you can make up your own. This is where life drawing sessions are key.
In this step I started defining the buttox, and lower back muscles. Notice how I am disregarding where the current lines lie, and will redraw, or remove existing lines in order to help make the correct flow.
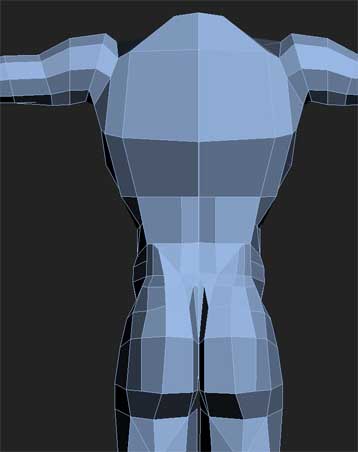
In order to define a muscle, or any feature for that matter, you have have to set its outline, or valley. The yellow lines are the "valley". Then you have to draw the actual definition lines, or peaks. The red lines are the "peaks". The valleys make it so that when you bring out the peaks, and then scale them , the definition is limited to within the valley lines. Many times, people will draw peaks, but not valleys, then when they scale the peaks, there is nothing to contain their definition, so the muscles end up weird looking.

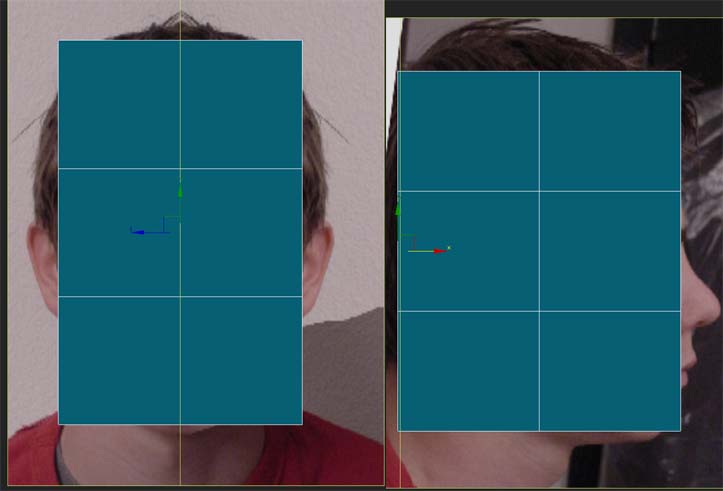
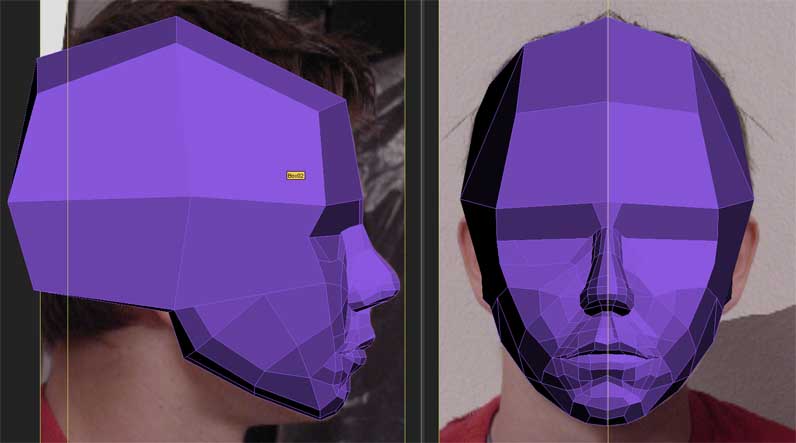
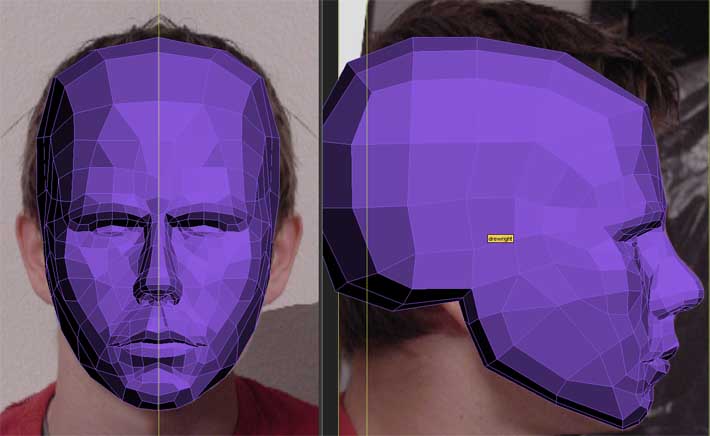
Now I am going to disobey everything I taught you about box modeling. For the head, start with a box. There are several reasons for this. One is that the head does have planes. Many people think of the head as round, but it has definite planes that it is broken into. the box helps define these planes. It also fits into the process of dealing with the head in quadrants. There is a special box to use though. Not just any box can be versatile enough to use for a human head, no no! This box must have one length and width division, and two height divisions. The reasoning for this will become evident, but trust me, it works.
Now like a bad boy, I went along way without saving between the last step and this one. Normally I save a new file about every 5 minutes, but I went kind of long in between on this one. I am doing all these screen grabs after the fact, so I can only capture from the files I saved at. I hope you can see what I did though.
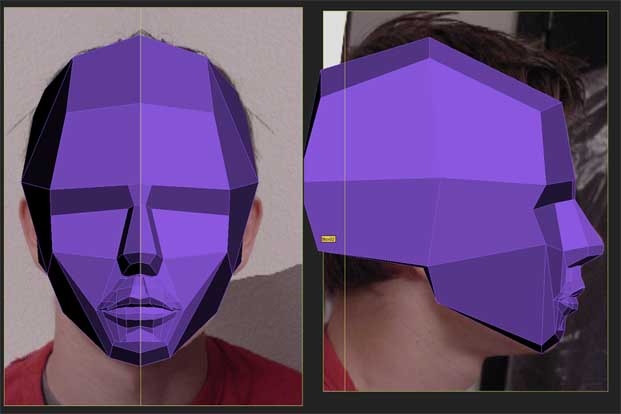
The top division line becomes the top of the brow, and the back of the head. The lower one becomes the tip of the nose, and the lower edge of the skull. the lower block should be deleted from your box so that it now as 2 quadrants in the back, and 3 in the front, when viewed from the side. In the mouth, I started defining the lips and then the nose in sections. I don't do an all over approach, but more a fine detail on one section, then move on, and so on.
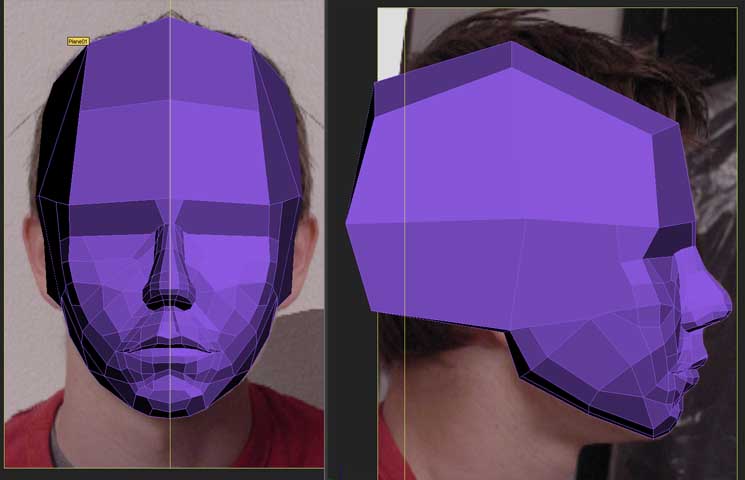
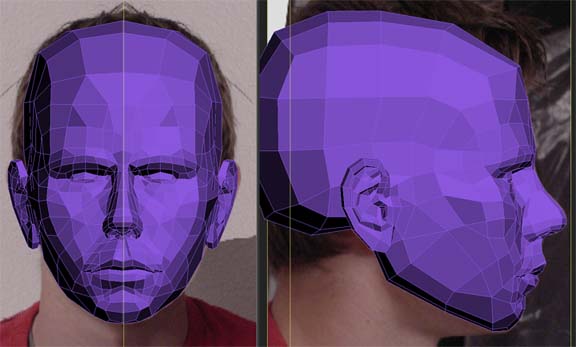
Here I started to draw in the lines of the cheek. I know that the detail is a little high here, but I like to be able to take away versus having to go back and add in detail on an area I already finalized. I did this all over the model, as an exercise on realism, as well as anatomy.
More detail in the cheeks.
Started on the eye brows.
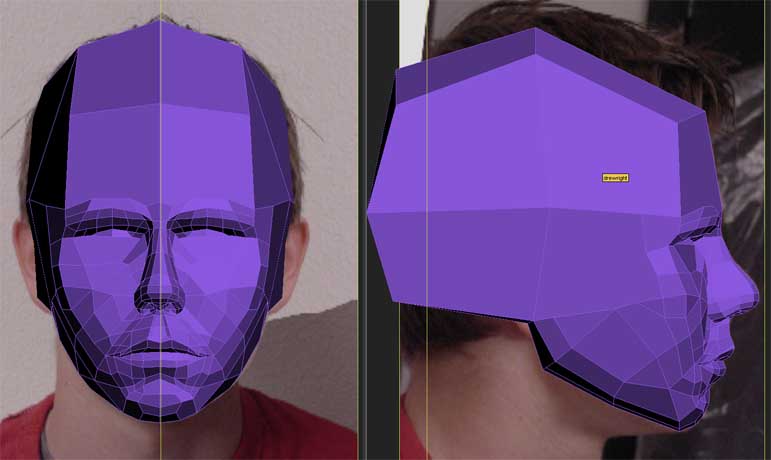
More detail under the eyes.
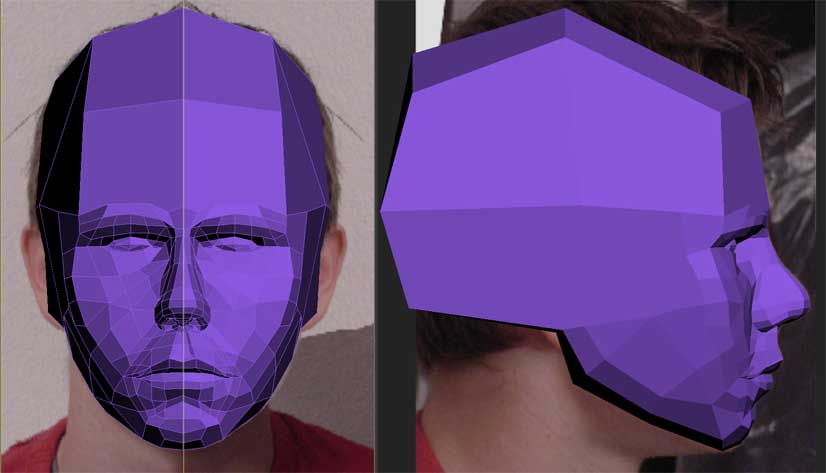
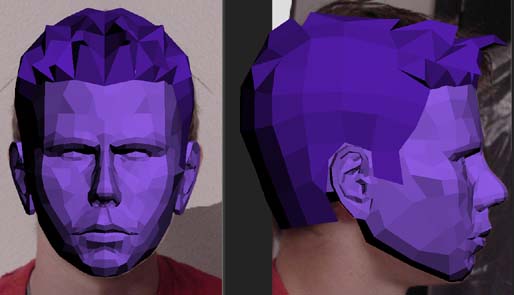
Now that the face is detailed, I went in and started rounding out the back of the head, as well as the forehead.
For the ears, I did them too quickly and there were no saves for me to screen grab. I created a box just like the one I make for my heads. Two division from top to bottom and one from front to back and one from side to side. I deleted the faces that were facing the head for when I attached it to the head. I used the peaks and valley's technique to define the topology of the ears inner detail.
The hair is a separate piece so that I could really get the neck attached correctly, and so I could play with different ways for the hair to look. I deleted the faces under the hair when I attached it, but I could have left them in for a bald character, and just alpha out the hair. (alpha is the term for transparency in gaming)
On the foot, I started with a cylinder for the main section, and a geosphere for the heel. I deleted most of the faces in the sphere, and merged most of the verts.
Extruded the toe.
Modeled the rest of the toes. After I combined it with the body, there was more tweaking to be done.
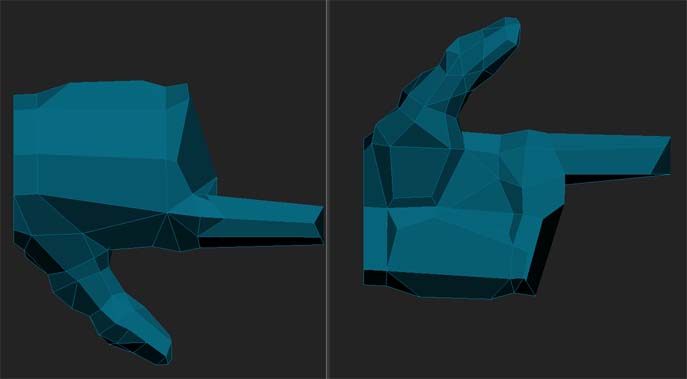
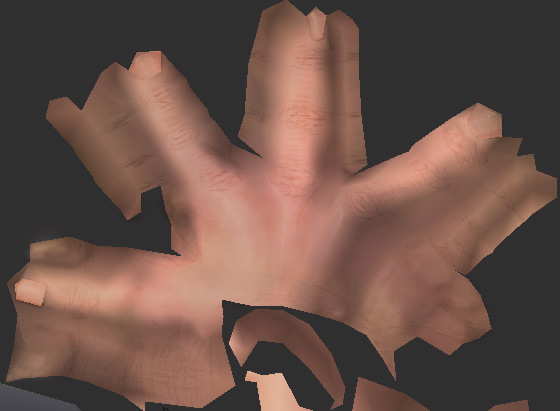
The hand started with a cylinder, that i started cutting using the peaks and valleys system. then I extruded the thumb and added cross sections where necessary.
The thumb all finished up.
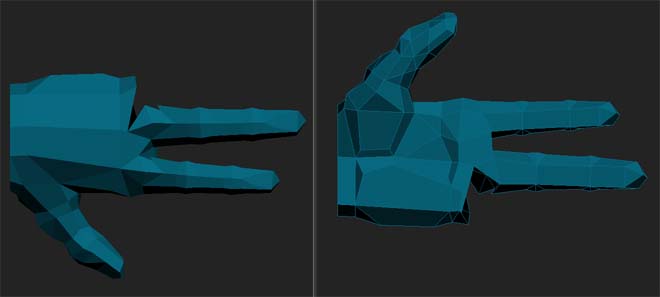
Starting on a finger.
When the first finger was done, I grabbed all the faces, and cloned to element, so that I could reuse it as the middle finger.
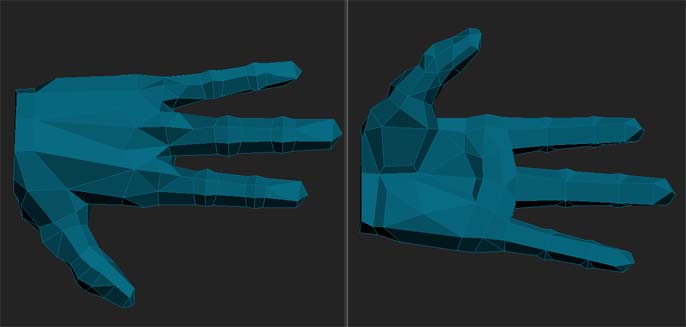
Cloned to element again, but this time I flipped it for the 3rd finger.
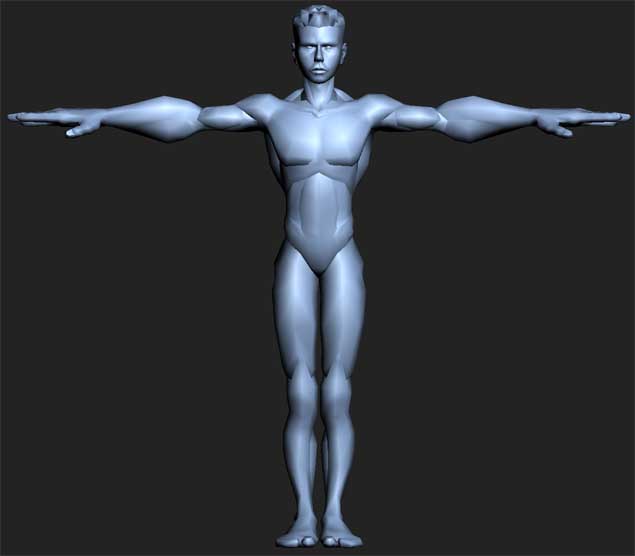
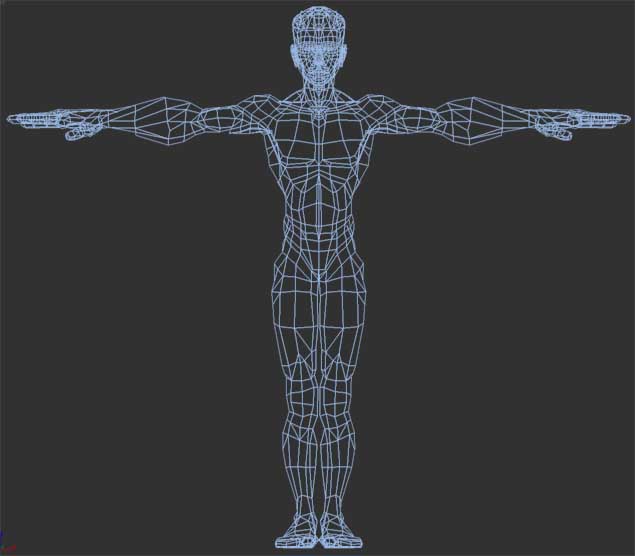
Here is the model in its final stage. 5000 polys. I used polycruncher to see how it would look at 3500 and it stands up nicely, but most of the detail in the face disappears. I will create a 3500 poly version for Unreal, but this model needs to hold up to up close facial animations for a future project.
Here is the wire frame. Notice how the lines flow in the correct directions, and help the model to "read" well.
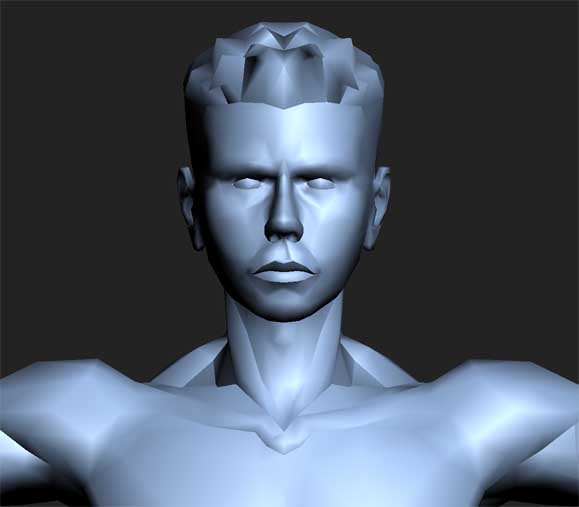
Up close of the facial detail.
Up close of the wire frame of the face.

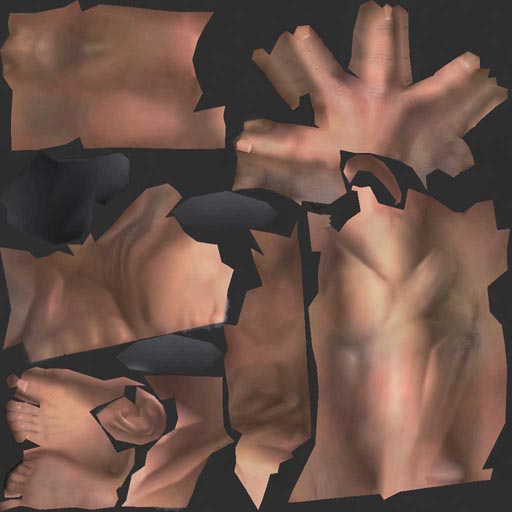
Disclaimer: The point that I am trying to make with this tutorial is sort of conflicting with how I actually did it. I wrote this tutorial to help with the new technology, but it was applied to a model using old technology. Let me clarify. We normally do not shade any volume in the diffuse map, only give it color. Then the normal map, and eventually geometry, will put in the shadows to show volume. This tutorial is to help with getting good skin tone, but because the character was not normal mapped, I still put in shadowing information. This is an incomplete tutorial, as it does not show my skin all the way to completion, but only shows a technique for skin tone.
There are a great number of texture tutorials out there. Having watched a great number of them, I have come up with this method for skin. I am not going to really focus on anything but the skin, because all the other parts were created using similar methods to all the other tutorials out there. The Hair was done using Adobes method, which works quite well.
The reason this method is different is that it combines the best of both of the main methods. I am speaking of painting all one one layer, where you have a pallette of colors that you pick from and paint all of them together. This allows for great results, if you are a great painter, but for most it can quickly lead to a muddy mess. It also doesnt leave room for much tweaking as everything was done on one layer. The second method is to paint all in greyscale, and then overlay a skin color. This method provides great tweakability, but doenst have that extra life that real skin has. My method allows you to have multiple layers, work only in greyscale so you can take your time, and still come out with a realistic looking skin. This allows you to revisit and tweak your volume layer (the greyscale) to your hearts content, and not worry about the colors getting all muddy.
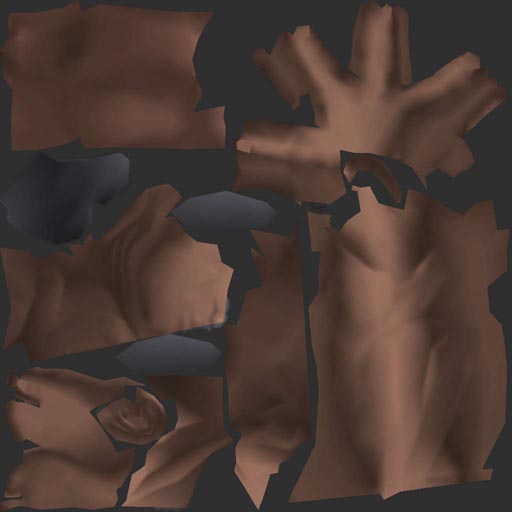
First arrange your lights in the positions and color that you want to be on your character, then bake a light map using Tex porter or texture kiln, or whatever bake to texture plug-in of choice. You need this to help you determine your light sources. On my model, there was enough detail in the geometry that most of the muscles and deformations were already formed by the tex porter bake in this map. This map will be referred to as "light map" you cant paint this entirely by hand if you want to as well. this should only have the large scale detail in it, such as biceps, pecs, calves, that sort. Anything finer, like the striations in a muscle, or the forearm muscles, save them for later. I will get to them, but it is important that this map only have about 60% of the volume information.
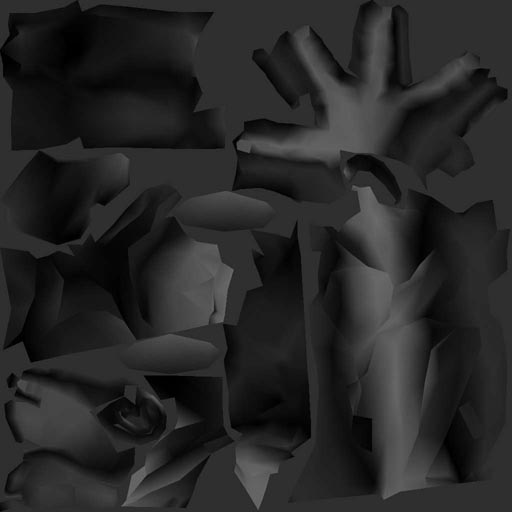
Adjust this layer, and blur to taste, so that it does'nt show all the evidence of the vertex based lighting. I will explain later, why this layer has a slight color cast to it, it is no longer pure greyscale.
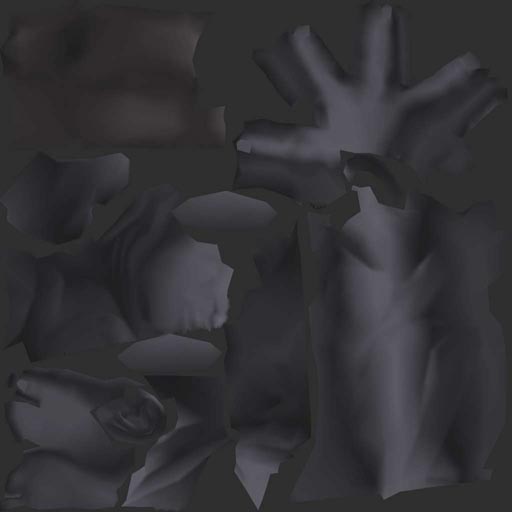
Next, create a flood fill layer of your skin color of choice. You will not touch this layer other than to adjust the overall color. this is where many people stop when creating a skin map. The create the volume in a greyscale layer, and then overlay a skin color. As you can see the results are good, but not yet looking like real skin. it lacks variation in color.
This next step I cannot take credit for, I saw harlequin use it in his time-lapse texture video. it provides a nice amount of skin color variation. Switch over to your channels and do a render clouds once in each layer, red, green, then blue, Your result should look like this. A nice funky cloudy rainbow.
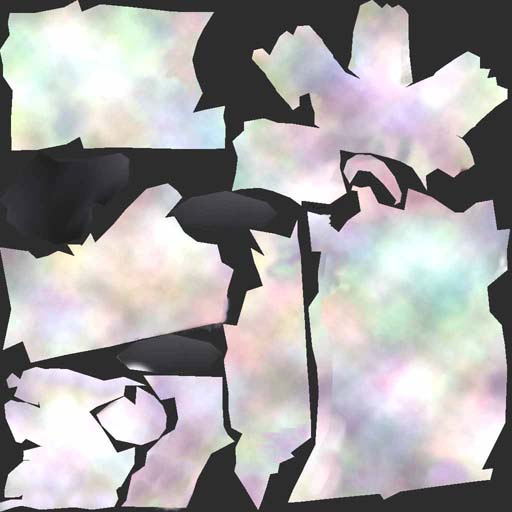
Set this layer to overlay over top of your flood fill skin layer. Then play with the contrast till it just varies your skin and not blows it into too many colors.
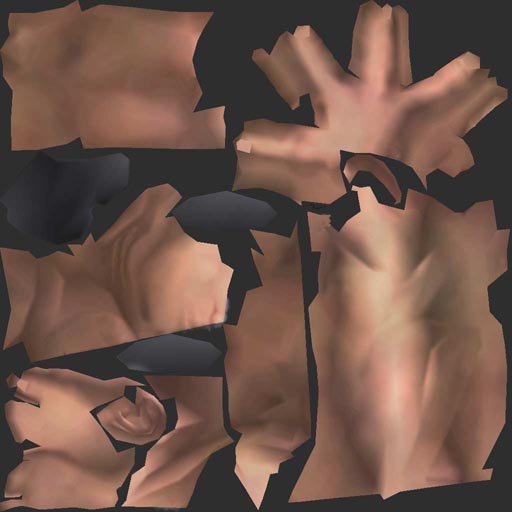
Check out how much just this did to your texture! So much more realistic. If you made your flood fill layer too bright previously, darken it so that when you overlay the rainbow layer it will be the correct lighting.
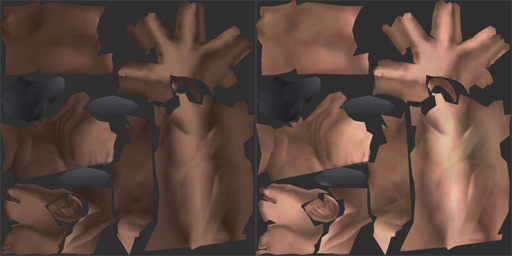
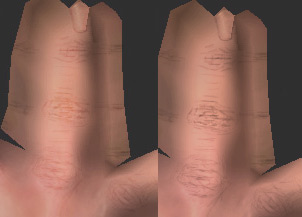
For the hands and feet. The wrinkles on your fingers and toes, are not deep enough to just get shadowed, so you cant just overlay a grayscale layer. Create a brand new layer for your hand and feet. This should be a middle grey layer, set to overlay, this will make it totally disappear. Then use the dodge and burn tools to sculpt the details of the hand. This layer needs to be above the rainbow layer, so that it is being overlayed on top of the rainbow, instead of the rainbow on top of the grayscale. This is very important. When it is above the rainbow, it turns the skin subtle hues that simulate the Sub surface scattering properties that skin has. if it is under the rainbow, it will just be darker gray, this will ruin the illusion of skin. The lower picture illustrates the difference. The left one, the details are above the rainbow layer, the right they are below. The difference is subtle, but noticeable.
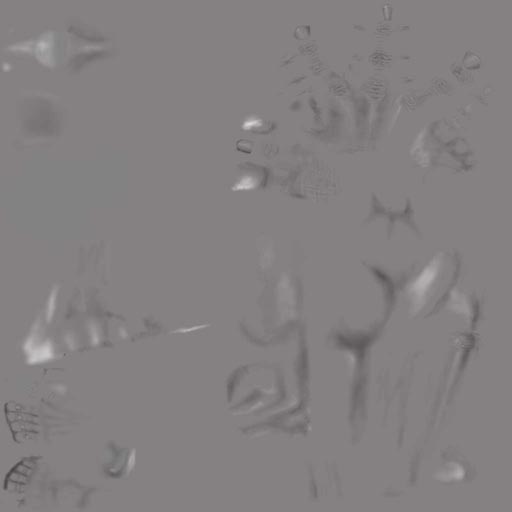
Remember how I said only to do the large scale details in your lightmap? There was a reason. Now create another middle gray layer, set to overlay so it dissapears, and paint all the smaller detail, and muscle striations, any muscles that need more definition than the light map gave them. It is important that this map have about 40% of the volume detail.
Ok, so far you say, this isn't that different from a normal texture tutorial. Many people use this method. Shoot, I didn't even mention using photo overlays, which are a great way to add skin detail, but I wanted to do this one from scratch.
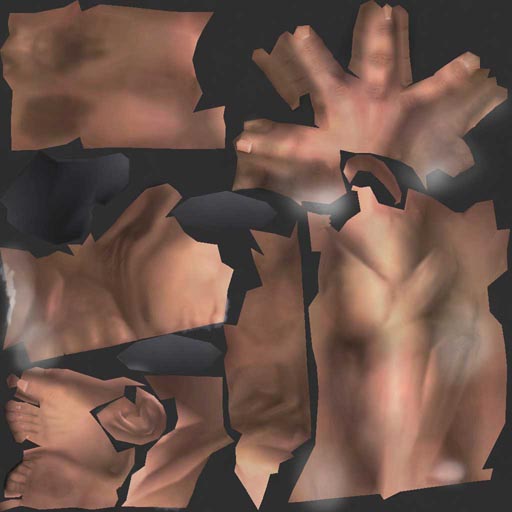
If you were to use all these detail layers to do a flat overlay, you would get an image like this

Now comes the fun part. The image above looks good, but it doesnt really run the full gamut of colors that real skin does. The shadows are what gives it away. They are just darker versions of the same skin color. This is why using overlays usually doesnt work, and why most texture artists resort to painting everything by hand, because they can paint the color into the shadows.
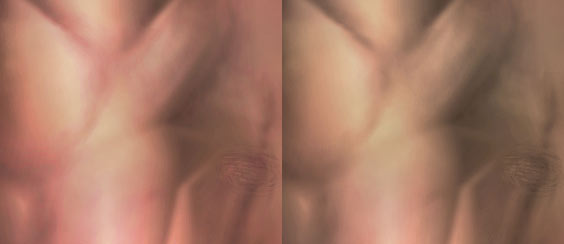
Take your gray scale layers, first your shadow map, then your fine details map (both are still grayscale), and colorize them. Either go to Image>adjustments>hue/saturation, or press ctrl+u. There is a box at the bottom that says colorize. Click this, and the greyscale image will now be a monotone color. Play with the sliders till it looks good with the skin. For mine, it was a deep blue for the light map, and a deep pink for the details layer. You will barely have to shift them, and the color will be barely noticeable, but when the skin layer interacts with it, you will get great shadow color in your map. You will have to experiment for a while, it took me a few tries, and Aaryn kept coming out looking like he had used sunless tanning oil, but when your done it should look something like this.
Notice how the image on the right does not seem like skin. It is lacking something. The image on the left, has those nice pink edges and blue shadows. I really turned it up so you could see the difference, but even when it is slight, it will do leaps and bounds for the believability of your skin.
Ok, so now you have great, believable skin tones, but wait, something still seems off. Its because the human body doesn't keep the same saturation all over. Joints, and other parts do not receive as much sun as the majority of your skin, so they are more pale. In order to accomplish this, and keeping with my method of being able to change everything, you don*t just want to desaturate your colors, you want to control it, and be able to put it back if need be. So create a new layer, and set the layer blending mode to Saturation. Now wherever you paint with a white brush, it will desaturate the layers below. I painted the elbows, the armpits, the fronts and backs of the knees. The image to the right shows where I painted, the layer is set to normal so you can see the brush marks.
This will result in nice areas of desaturated skin.
There you have it, a great way to paint skin tones. All the flexibility of layers and being able to tweak, and still get great results as if you hand painted everything.